
Creating a skill for Alexa is reasonably straightforward once you get your head around the main concepts. My cracker-pulling skill is simpler than most as it does not have any kind of conversational flow - it always answers your query and that’s the end of the interaction. There’s no way to pose an incomplete query to the skill so that it has to prompt for more information. This probably makes it a good skill to look at to start with as it omits some complexity.
This walkthrough won’t cover the complete code used in my skill (because a lot of it isn’t Alexa-specific), but will show you how to fit all the moving parts together to make your own skill.
There’s also other ways to do and manage some of the steps here, like serverless frameworks and AWS tools. I’m omitting those here to keep things as simple as possible.
What we’re creating
bMotion is my eggdrop script for Artificial Stupidity, and a popular plugin for it is one which allows users to pull a Christmas cracker with the bot. Doing so results in either you or the bot winning the prize from the cracker, which is picked from a list of random objects the bot knows. It also tracks how many hats each user and the bot has (i.e. how many times each has won). Out of scope for this implementation is the way that bMotion tracks items it likes and dislikes, and the cracker logic responds differently to the objects “in” the cracker and who wins.
The code for bMotion’s cracker handler is in this plugin and even if you’re unfamiliar with TCL (a state I recommend) it is fairly easy to follow. Less than half of the file is logic and the rest of it is the content the plugin uses to generate output.
Ultimately the flow of execution for pulling a cracker is:
- Pick a sound effect for the cracker to make
- Pick who wins, either the bot/Alexa or the user
- Pick a prize
- Increment the hats counter for the bot/Alexa or the user
- Maybe tell the user about the hat count
The other executions we want to handle are being asked how many hats the user or the bot/Alexa is wearing.
We can store the number of hats the user and Alexa are wearing in DynamoDB.
How Alexa skills work
Alexa skills are triggered by utterances, which are phrases the user says. Those map to intents, which are the discrete things your skill can do. Not included in this skill are slots, which are terms in the utterance that are effectively parameters for your skill, such as the number of minutes a timer is being set for.
Typically your skill is handled by a Lambda function, which receives a request object which contains information including the intent which should execute, the values which went in the slots, and a user id (which represents the account associated with the Echo device).
The function should return a response object, which among other things should contain the text Alexa should speak back to the user and if it should listen for further utterances or not. It can also include data which shows as a card in the Alexa app.
Prerequisites
An Amazon Web Services Account
Go to https://aws.amazon.com and sign up. Everything we’re doing should be covered by the free tier.
An Amazon Developer Account
Go to https://developer.amazon.com and go to the Sign In page to sign up.
An Echo device
Actually this is probably optional, but without one this is much less useful. And that’s in the context of “thing which lets you pull virtual crackers with a computer.”
Creating the framework
To create a skill, you need a Lambda function which knows how to handle and respond to the requests, a list of intents and their slots (and the data type for each slot, to help Alexa understand how it should transcribe what it hears), and a list of example utterances which map to intents. The utterance training data is a list of ways the user could phrase invocation of the intent, and the Alexa service can extrapolate more ways to express queries than you list so it does not need to be exhaustive, but it should be fairly complete.
The sample utterances (the list of example phrases to trigger an intent) for the cracker skill are:
PullCracker pull a cracker
CountHats how many hats am i wearing
CountHats how many hats do i have on
CountHats how many hats have i won
AlexaHats how many hats are you wearing
AlexaHats how many hats do you have on
AlexaHats how many hats have you won
You can see that the training data gives the name of the intent, followed by an example utterance which should trigger it. (The names of the intents are something you decide.) The utterances here will be generally be prefixed with “Alexa, ask bMotion …” but you don’t specify that bit.
Here’s the intent JSON for the cracker skill, which omits the standard Amazon intents for cancelling etc.
{
  "intents": [
    {
      "intent": "PullCracker",
      "slots": []
    },
    {
      "intent": "CountHats",
      "slots": []
    },
    {
      "intent": "AlexaHats",
      "slots": []
    }
  ]
}
Finally we “just” need to write the functions which handle the intents. I prefer Python, and there’s a nice library called ask-alexa-pykit which helps handle the standard parts of interacting with Alexa.
Writing the code
First, in a new project directory, we pull in ask-alexa-pykit.
% mkdir alexa-cracker
% pip install ask-alexa-pykit --target alexa-cracker
The ask-alexa-pykit README describes how to use it to create intents and utterance training data, although we’re not going to use that. The intent data (minus the standard cancel, stop, and help intents) is shown above, as are the utterances. We don’t need to supply these files with the function code, but I keep them in the repository anyway as a reference. We’ll copy/paste them into the skill configuration page later.
Now we create the code Lambda will load and run, which will be in lambda_function.py (although it can be called anything).
Here’s the structure of the code to get things started. This goes in lambda_function.py.
from ask import alexa
import boto3


def lambda_handler(request_obj, context=None):
    metadata = {}

    return alexa.route_request(request_obj, metadata)


@alexa.default_handler()
def default(request):
    return alexa.create_response('You can ask me how many hats either of us is wearing, or to pull a cracker.')


@alexa.intent_handler('PullCracker')
def pull_cracker_handler(request):
    """We'll write this function below."""
    pass


@alexa.intent_handler('CountHats')
def count_hats_handler(request):
    """We'll write this function below."""
    pass


@alexa.intent_handler('AlexaHats')
def alexa_hats_handler(request):
    """We'll write this function below."""
    pass
lambda_handler is the function Lambda will be configured to execute. It uses a function from ask-alexa-pykit which will inspect the request and call the correct function for us. The functions to handle the intents are decorated with @alexa.intent_handler() and the intent name. The function name does not have to have any relation to the intent name. It should accept a single parameter, which is the request object. This can be examined to find out information including the unique user id for the account the request came from. We’ll use this to track hat counts.
There’s also a function decorated as default_handler, which is the one used when the skill is “opened” without an intent (“Alexa, open SKILLNAME”). Here you can see it uses another helper function from the library which creates the response for Alexa to read.
We’ll look at the content for the other request handlers shortly.
boto3 (docs) is imported as we’ll use it for accessing any AWS services, like DynamoDB.
Counting hats
We’re going to use DynamoDB to store hat counts, so let’s create the client/table objects. By creating these outside of the handler functions, they persist for the lifetime of the Lambda container, saving the overhead of recreating them every time the handler is called. The name of the table we use will come from an environment variable, so that it can be changed in the Lambda function configuration. This code goes at the end of the file:
dynamodb = boto3.resource('dynamodb')
table = dynamodb.Table(os.environ['BMOTION_TABLE'])
And at the top, add import os.
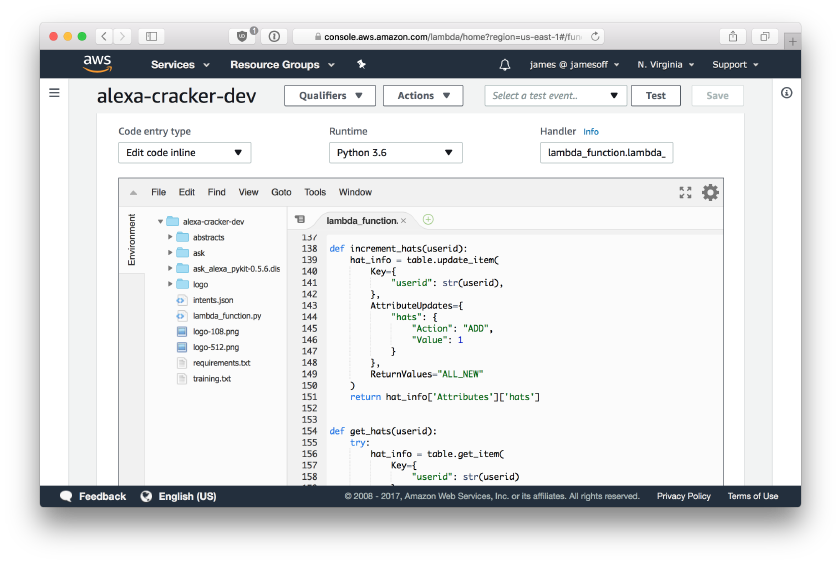
Let’s write the functions to get and increment the number of hats for a user.
def increment_hats(userid):
    hat_info = table.update_item(
        Key={'userid': str(userid)},
        AttributeUpdates={
            'hats': {
                'Action': 'ADD',
                'Value': 1
            }
        },
        ReturnValues='ALL_NEW'
    )
    return hat_info['Attributes']['hats']


def get_hats(userid):
    try:
        hat_info = table.get_item(
            Key={'userid': str(userid)}
        )
        hats = hat_info['Item']['hats']
    except:
        hats = 0
    return int(hats)
Let’s examine the get_hats function as it’s the most straightforward. We try to read an item out of our table (as initialised using the code above), using the userid passed to the function as the search value. On finding the matching item, we read the hats property from it. If the item doesn’t exist, or it doesn’t have that property, the exception handler will set the hat count to zero. Then, we return the value.
For incrementing the hat count (when the user or Alexa wins), we could read the value, increment it, and store it. In a larger system, with more concurrent access, this would leave us open to a race condition, where two copies of our function could execute at the exact same time. Both would read the current value, increment it to the same new value, and both write that back. The result would be the value would have increased by one when it should have increased by two.
Because we care about Doing Things Right, we can use an atomic operation in DynamoDB, which lets us tell it to increment the value in such a way that another client doing so at the same time would have to wait until we’d written the new value, and then they would read that, increment it and write their new value.
To do this, we use the update_item method on the table, passing the same Key structure to locate the item we’re interested in, and telling DynamoDB what update operation (ADD) we want to perform. We also ask it to return the new value of the item us so we can use it immediately, without having to get_item it immediately to find out what the value is. If the item doesn’t exist (i.e. this is the first time this user has won), DynamoDB treats the missing value as 0, and increments it to 1.
Creating the table
We need to create the table in DynamoDB ready to store the data.
- Sign in to the AWS Console, and go to DynamoDB.
- Click Create Table. In the table name, enter
bmotion. - Set the Primary Key to
userid, with typeString. - Turn off Use default settings, then turn off the “Auto Scaling” checkboxes for Read capacity and Write capacity. Set the Read capacity units and Write capacity units both to 1.
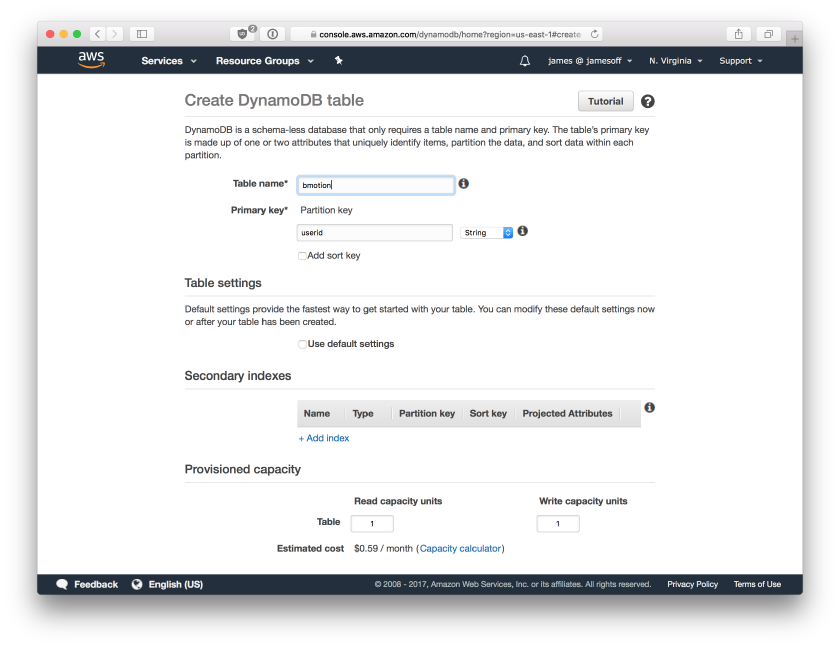
Note that while it gives an estimated cost for the table, as long as your total DynamoDB unit usage is inside the free tier, you won’t be charged.
- Click Create.
Table creation will take a minute or so. In the meanwhile, make a note of the ARN, which we will need for granting the Lambda function access to the table later. It’ll look like arn:aws:dynamodb:us-east-1:1234567890:table/bmotion and you can find it at the bottom of the Table Details section.
Handling a request
So how do we handle a request? When the user asks your skill for something, which matches one of the utterances (and so an intent), Alexa sends your code a request. The request data includes the intent the user triggered, and if we had any, the values which go in the slots (e.g. the length of time a timer should run for).
The library we’re using to write this function looks at the request object for you (alexa.route_request()) and calls the request handler function (which it knows because of the @alexa.intent_handler() decoration).
Here’s what the code for counting the user’s hats looks like (although not exactly; my real one contains logic for using different responses and so on):
@alexa.intent_handler('CountHats')
def count_hats_handler(request):
    hats = get_hats(request.user_id())
    if hats == 0:
        retval = 'You have no hats.'
    elif hats == 1:
        retval = 'You have one hat.'
    else:
        retval = 'You are wearing {} hats'.format(hats)
    return alexa.create_response(retval, end_session=True)
First, we call our get_hats() function to read the number of hats this user has from DynamoDB. Then we just select the right output based on that number, and finally send the output back to Alexa. For this response, we’re setting end_session to True, which tells Alexa we’re done with this interaction. The practical result of this is that on the user’s device, the light ring goes out and Alexa stops listening for more utterances.
If we didn’t set this, the light would stay on, and Alexa would be waiting for more input (to our skill). This more for when you need to ask the user for more information to clarify something (e.g. “Alexa, set a timer” “For how many minutes?”). Session management is beyond the scope of this guide.
Pulling a cracker
Here’s an example function for pulling a cracker, which goes through the steps outlined above. Again, my actual code is more involved mostly to give greater variety of content.
# add this line to the top of the file
import random


@alexa.intent_handler('PullCracker')
def pull_cracker_handler(request):
    prizes = ['mood fish', 'plastic frog', 'magnifying glass']
    retval = '<say-as interpret-as="interjection">{}</say-as>'.format(random.choice(['boom', 'pop', 'snap']))
    retval = retval + '<break time="0.5s" />'
    winner = random.choice(['alexa', 'user'])
    if winner == 'user':
        retval = retval + 'You won, and you got a {}!'.format(random.choice(prizes))
        hats = increment_hats(request.user_id())
        if hats > 1:
            retval = retval + " You're now wearing {} hats.".format(hats)
    else:
        retval = retval + 'I won, and I got a {}'.format(random.choice(prizes))
        hats = increment_hats(request.user_id() + ':alexa')
        if hats > 1:
            retval = retval + " I'm now wearing {} hats.".format(hats)
    retval = '<speak>{}</speak>'.format(retval)
    return alexa.create_response(
        message=retval,
        end_session=True,
        is_ssml=True
    )
This function builds the output for Alexa a bit at a time. The first bit picks a sound effect for the cracker. It uses SSML, which lets us control how Alexa speaks the text a bit more. The sound of the cracker is marked up as an interjection.
Next we add a short pause, while Alexa locates the bits of cracker and prize which fell on the floor.
We pick a winner at random, and then tell the user they won or that we did, and what the prize was. The hat count is incremented using the code we wrote earlier, and we add output telling the user the new number of hats.
Finally we need to wrap the whole output in <ssml> tags, and then we return it to Alexa.
Uploading to Lambda
Now we need to upload our code to Lambda so that it can executed by Alexa.
- Sign in to the AWS Console and head over to Lambda.
- Click the Create Function button, then Author from scratch.
- Name the function something like
alexa-cracker. - Select Python 3.6 for the runtime. For the Role, select Create a custom role, which will open a new window. In this window, select Create a new IAM Role, and enter a name like
alexa_cracker_role.
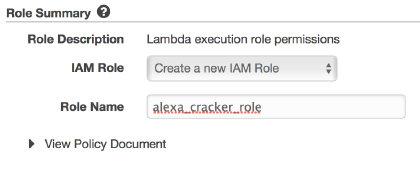
- Click Allow, which should return you to the Lambda setup with the new role name filled in. If it’s not filled in, select it from the Existing role dropdown.
- Click Create Function, and you should end up at the function Configuration page, which shows among other things the function code. We can’t just paste in the Python here, as we’re using the ask-alexa-pybot library. Instead, we’ll need to upload a Zip file of the code and library.
- In your terminal, in the
alexa-crackerdirectory, create a zip file:
% zip -r ask-lambda.zip *
- In the Lambda console, from the Code entry type dropdown (you may need to scroll down) choose “Upload a .ZIP file”, then click the Upload button and choose the Zip file just created.
- Change the Runtime to Python (to match your targeted version) if needed, then click the Save button (at the top of the page).
- When the page reloads, your code should be visible in the editor.
Configuring Lambda
DynamoDB access
We need to adjust the Lambda execution role so that it’s allowed to use the DynamoDB table.
- Go to the IAM Console.
- In the search box top left, put in the name of the role name you gave while creating the function, and select it from the list of results (it’ll be the one with the blue wand icon).
- You should see the Permissions tab, which should give specify one policy called something like
oneClick_lambda_basic_execution_.... Click the arrow next to the policy to expand it, then click Edit Policy.
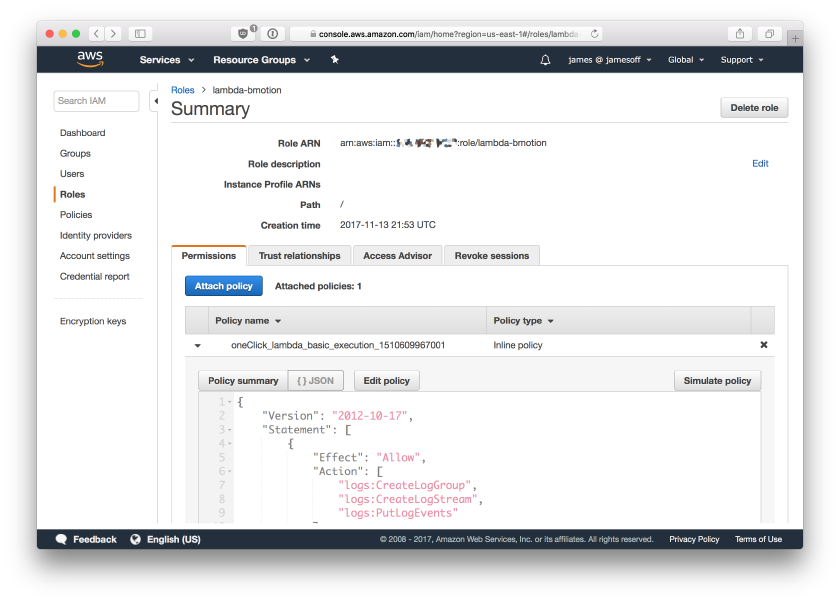
- In the editor which opens, make the policy look like this, but substitute the ARN of your DynamoDB table:
{
    "Version": "2012-10-17",
    "Statement": [
        {
            "Effect": "Allow",
            "Action": [
                "logs:CreateLogGroup",
                "logs:CreateLogStream",
                "logs:PutLogEvents"
            ],
            "Resource": "arn:aws:logs:*:*:*"
        },
        {
            "Effect": "Allow",
            "Action": [
                "dynamodb:putitem",
                "dynamodb:getitem",
                "dynamodb:updateitem"
            ],
            "Resource": "arn:aws:dynamodb:us-east-1:1234567890:table/bmotion"
        }
    ]
}
This adds the rights to perform putitem, getitem, and updateitem on your table to the Lambda function. Save the policy.
Alexa trigger
We also need to make Lambda aware that Alexa is going to trigger this function.
- On the Lambda function page, in the Add Triggers section near the top, click Alexa Skills Kit to add it.
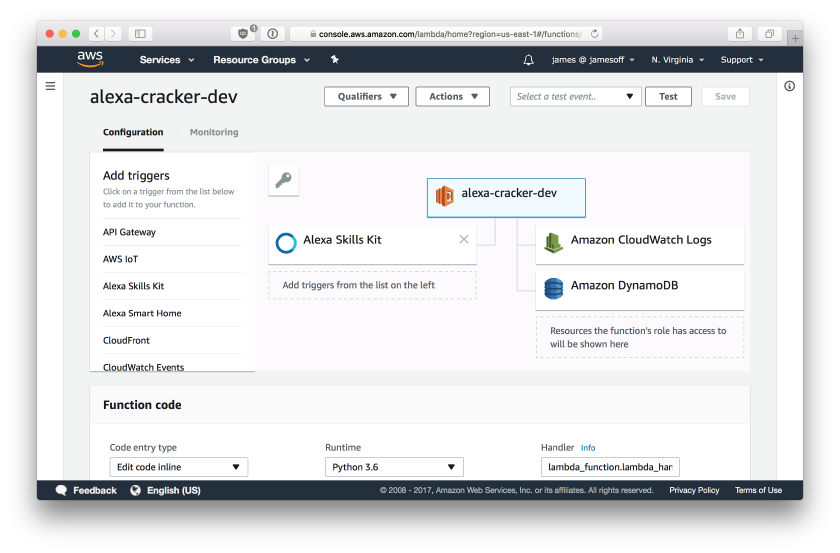
- Click Add on the section below, then Save top right.
Environment variables
In the code, we told Python to find the name of the DynamoDB table to connect to in the environment. We need to tell Lambda to populate this value for us.
- You may need to click the widget near the top with the Lambda icon and your function name in it, so that the Function Code section shows up.
- Scroll down in the Lambda console and find the Environment Variables section.
- Enter a key of
BMOTION_TABLEwith a value of the name (not the ARN) of your DynamoDB table.
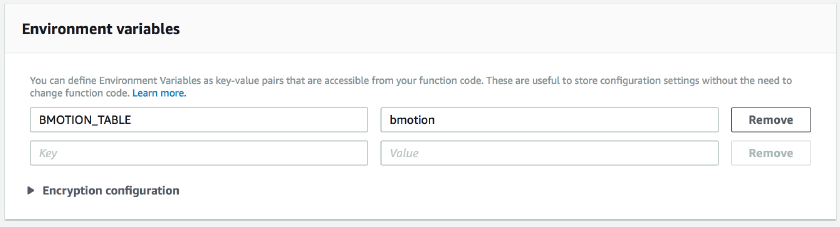
- Click the Save button at the top.
Testing the function
We can test our function to make sure it executes correctly.
- At the top of the Lambda console, open the dropdown next to the Test button and choose Configure test events
- Select Create new test event, select Alexa - GetNewFact. This is a sample event which has an intent with no slots, so it’s a good match for our code.
- Give the event a name, like
alexatest - In the editor below, find the line reading
"name": "GetNewFactIntent", around line 20, and change it to"name": "PullCracker" - Save the test event
- Make sure you event name is selected in the drop down now, then click Test
- Hopefully you’ll get a green box with the output of your function, and you’ll be able to see the SSML which Alexa would read out. If you run the test a couple of times you should see your (or Alexa’s) hat count show up appropriately too.
If you get a cross red box then you will need to examine the error message to determine what’s wrong.
Configuring the Skill
Sign in to the Amazon Developer Portal and then head over to the Alexa Skills Kit section. Click Add a New Skill.
Leave Skill Type as Custom Interaction Model, select the correct language, and enter a name and an invocation name. Leave the Global Fields all at No. Click Save and then (once it shows up), Next.
Copy your intent schema file contents and paste it into the box. Skip the Custom Slot Types section. Copy your utterance file and paste it into the Sample Utterances box. Click Next and wait a few seconds while Amazon does some processing.
On the Configuration page, select AWS Lambda as the Endpoint, and paste in the ARN of your Lambda function (you can find it at the top right of the function page, and it’ll look like arn:aws:lambda:us-east-1:1234567890:function:alexa-cracker). Select No for geographical endpoints. We also don’t want Account Linking or any of the Permissions. Click Next.
You should now be on the Test page, which means if the switch at the top of the page is set to Enabled that your skill should be enabled on your account and you can access it from your Echos.
Alexa, ask bmotion to pull a cracker
You can also type pull a cracker into the utterance box in the Service Simulator section, and click the Ask button to see the output from your function.
What next?
Getting the skill certified. You’ll need to make sure you’re handling all the “system” intents for things like cancelling and requesting help. You should go through the certification documentation which is pretty clear.
My first submission of this skill was rejected because I needed to spell out the skill name as b. Motion not bMotion, but the rejection email told me exactly this, and where in the configuration it needed to be changed. After fixing these issues it was approved. Each review took around 12 hours. Then you can publish your skill to the world and watch the dashboard to see how it’s being used. Don’t forget your hat!
Code Repo
You can find the code used in this article at alexa-cracker-sample.